Installing Driver Appx packages during CM/OSD
4/30/2020
The implementation of the UWP driver model by Microsoft imposes restrictions on how a complete driver package can be deployed when a PC is (re)imaged. Drivers with a control UWP application are split between the hardware-enabling driver and an appx package, typically installed with DISM.
Every driver is delivered by HP as a Softpaq (packaging method developed by Compaq long ago), and, for each driver that requires it, contains both the driver and the UWP appx control application. When the Softpaq is executed in Windows, both the driver and the appx application are installed.
However, when utilizing enterprise deployment tools, like Microsoft MEMCM, systems are imaged by applying Windows and then injecting the drivers (usually from DriverPacks), where only the drivers are installed. This results from the default behavor that the installation of a UWP appx application should done by a user from the Windows app store; which means a user profile was created and a user was logged in. The issue is that in most cases, access to the Windows store is curtailed in corporate PCs, resulting in some functionality missing from the PC. A pen/stylus application comes to mind, for example.
More on drivers UWP application installations at: https://docs.microsoft.com/en-us/windows-hardware/drivers/devapps/auto-install-for-uwp-device-apps
In order to help with the installation of drivers’ appx applications, we will show how to package and inject these components into the default profile as the image is being built in an OS deployment task.
NOTE: The process outlined below can vary by driver, where the UWP control application can be packaged differently by vendor. Also, with our technique, if the Softpaq itself requires separate installation, its UWP appx package will be installed prior to the Softpaq – think HP Hotkeys software here. To alleviate the inconsistencies, HP software teams are developing a more standardized method for delivering drivers’ UWP components, so in the future, packaging these for installation will be made simpler.
The first step is to identify which drivers contain UWP applications and then to find and package those for installation. The best tool for identifying Softpaqs that contain UWP components is HP Image Assistant (HPIA). HPIA can list all available Softpaqs for any HP supported system and supported Windows versions. When analyzing for a product and OS, the resulting list will include an UWP icon next to the Readme and CVA icons, as needed. You can also select to have HPIA check ONLY Softpaqs with UWP packages

To deliver each driver UWP application, we first download and expand the Softpaq, then locate the DISM install command string.
Notes for unpacking:
-
An HP Softpaq can be unpacked using these options: “SP12345.exe /s /e” # which unpacks to C:\SWSETUP\SP12345 by default
- Sometimes the UWP appx is in its own install cmd batch file, while at other times (like in B&O software) it’s part of the full Setup.bat contained in the extracted Softpaq.
Each driver UWP application will require separate install steps ins a Task Sequence:
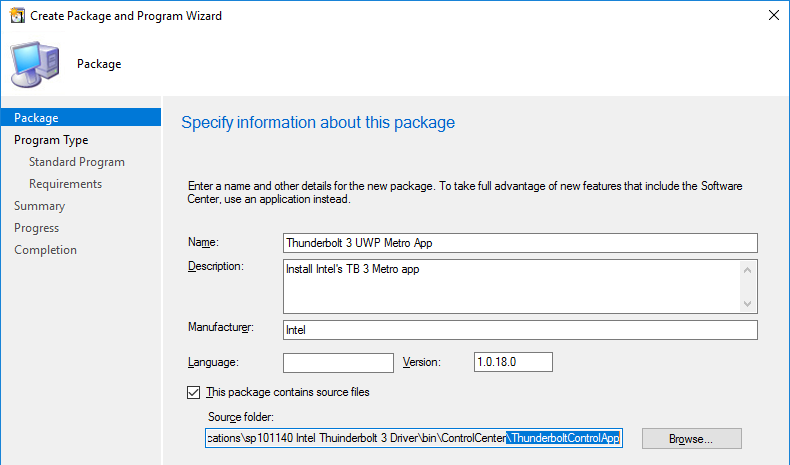
- In MEMCM, we will create a Package that will hold the appx application. The source for the package will be the share path where the edited CMD file is located.
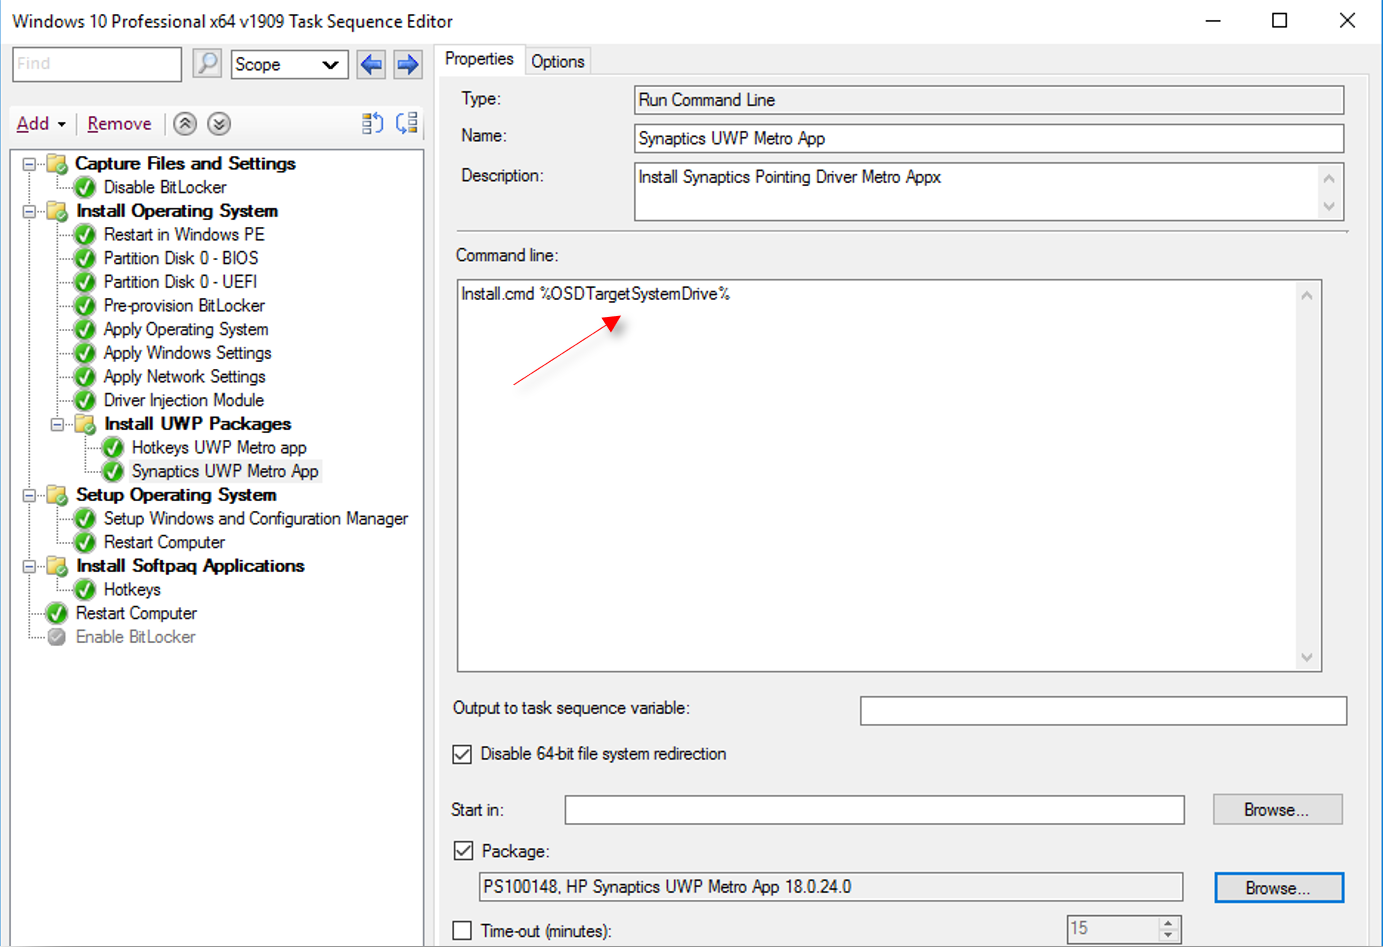
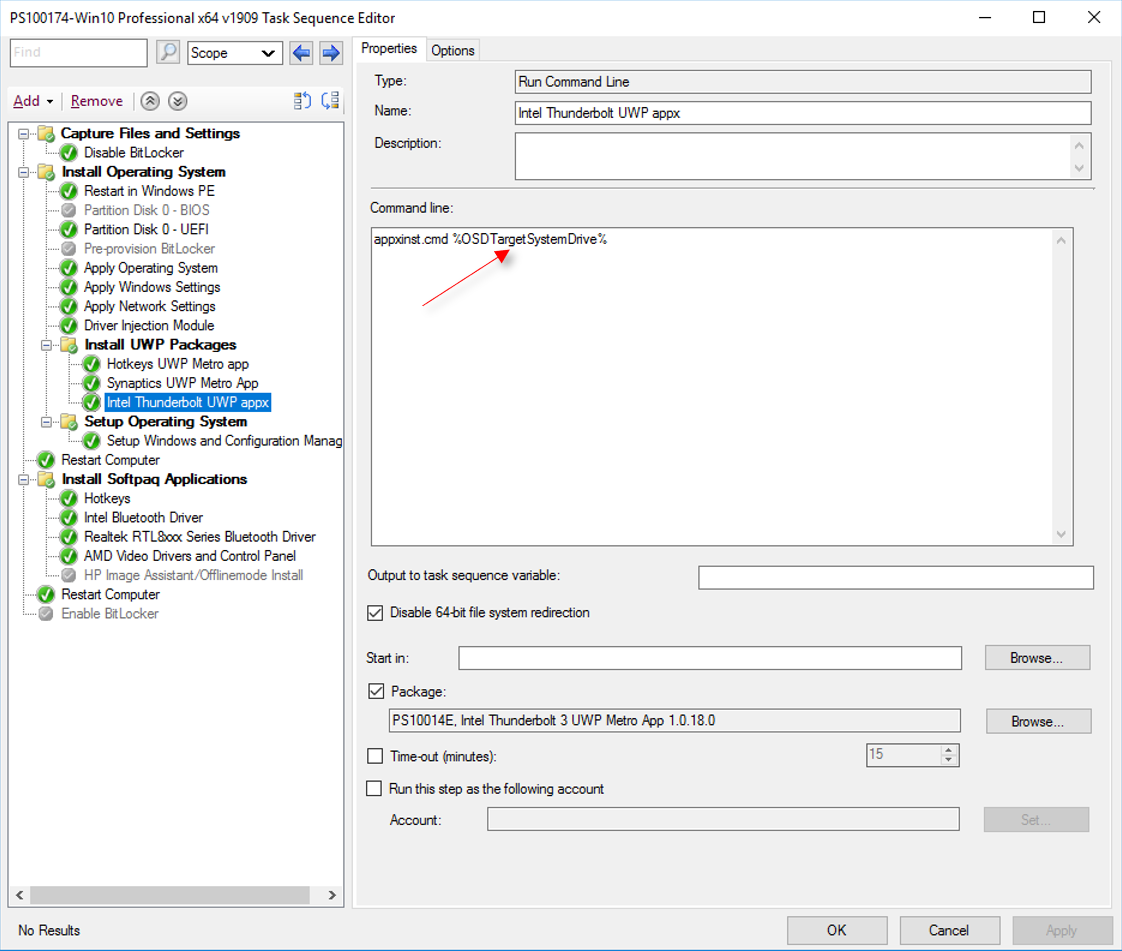
- Next we add a TS step to your deployment Task Sequence that will call the DISM CMD batch (modified for offline injection). We will also provide a system variable when invoking the command file, %OSDTargetSystemDrive%, that represents the WinPE drive where Windows is applied
NOTE: follow screenshots below for examples of deploying HP Hotkeys, Synaptics Pointing Device, and Intel Thunderbolt appx control apps, and the separate Softpaq package – needed for Hotkeys - prior to OOBE.
Finding the appx installation command
As already mentioned, we must locate the file for the actual UWP installation portion and modify the DISM string in that file. One way to locate the file is with PowerShell. For example – let's find every file that contains a DISM string (appx packages are installed with DISM):
PS E:\share\Applications> Get-ChildItem -Recurse ‘FilePath’ | Select-String ‘dism’ -List | Select -Unique Path
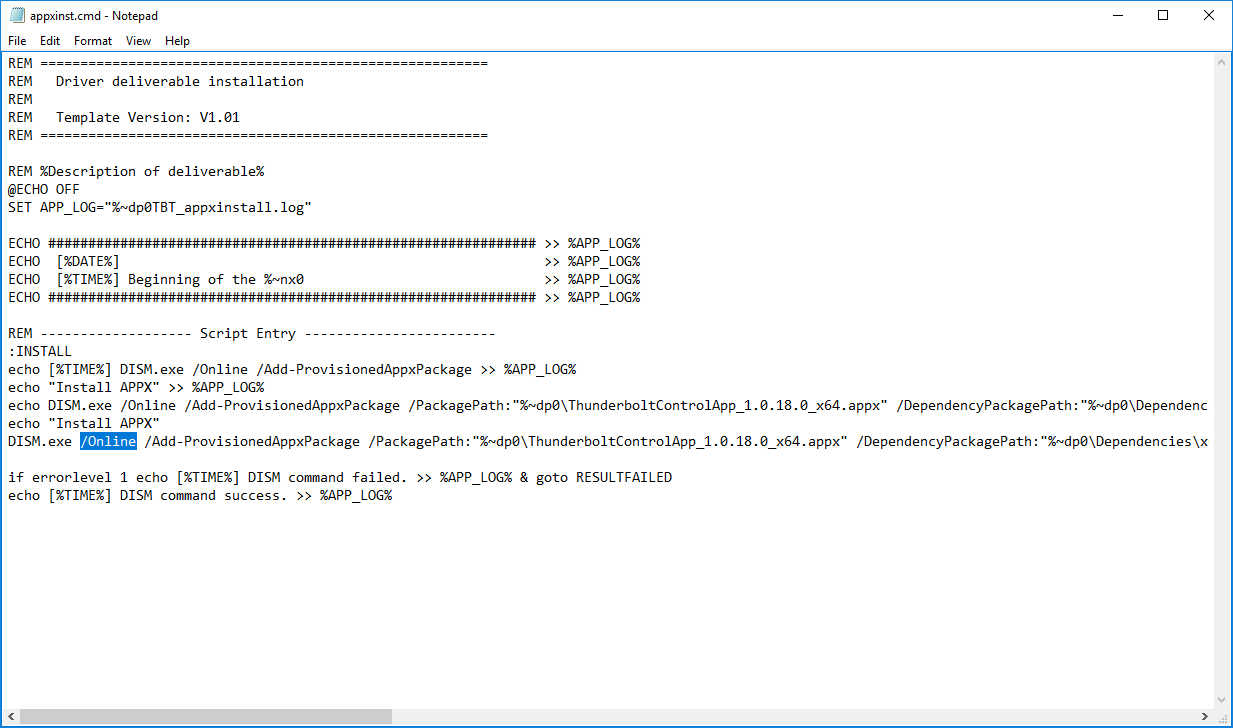
Unfortunately, there is no cheat sheet for finding the appx installation from an extracted Softpaq. It can be part of a setup.bat, or it may have its own appx install batch file). And, not all the appx install files are named the same. For example, the one for the Thunderbolt Control Center (currently) is called appxinst.cmd, where below you can see the Hotkeys has a different name.
Finally, the method injects the appx package into the image during OSD prior to a user profile being created. This way the app should be present for any user profile signing in after the image is laid down
HP Hotkeys UWP Appx Installation
Step 1: Download and unpack the HP Hotkeys Softpaq to a MEMCM share
Example (sp99442.exe):
- Use HP Image Assistant, which will download and Unpack to C:\HPIADownloads, or
- Download Softpaq and run: “sp99442.exe /s /e” which will unpack to C:\SWSETUP\sp99442
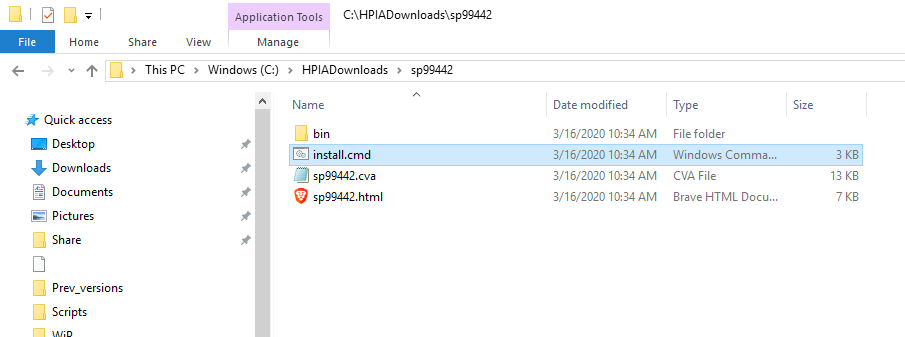
- Copy the full Softpaq to a MEMCM share (we will use \\CM01\share\Applications for this example)
Step 2: Find the file containing the command in the copied folder where the appx gets installed with DISM – we try the command show above:
PS E:\share\Applications> Get-ChildItem -Recurse ‘FilePath’ | Select-String ‘dism’ -List | Select -Unique Path
We find the DISM install runstring in install_hpks_sysinfo_app.cmd:

Next, edit the cmd file, and look for the DISM installation of the appx application

Modify the DISM installation string from /Online to /Image:%1\

Step 3: In MEMCM, create a Package to deliver the UWP portion of the applications
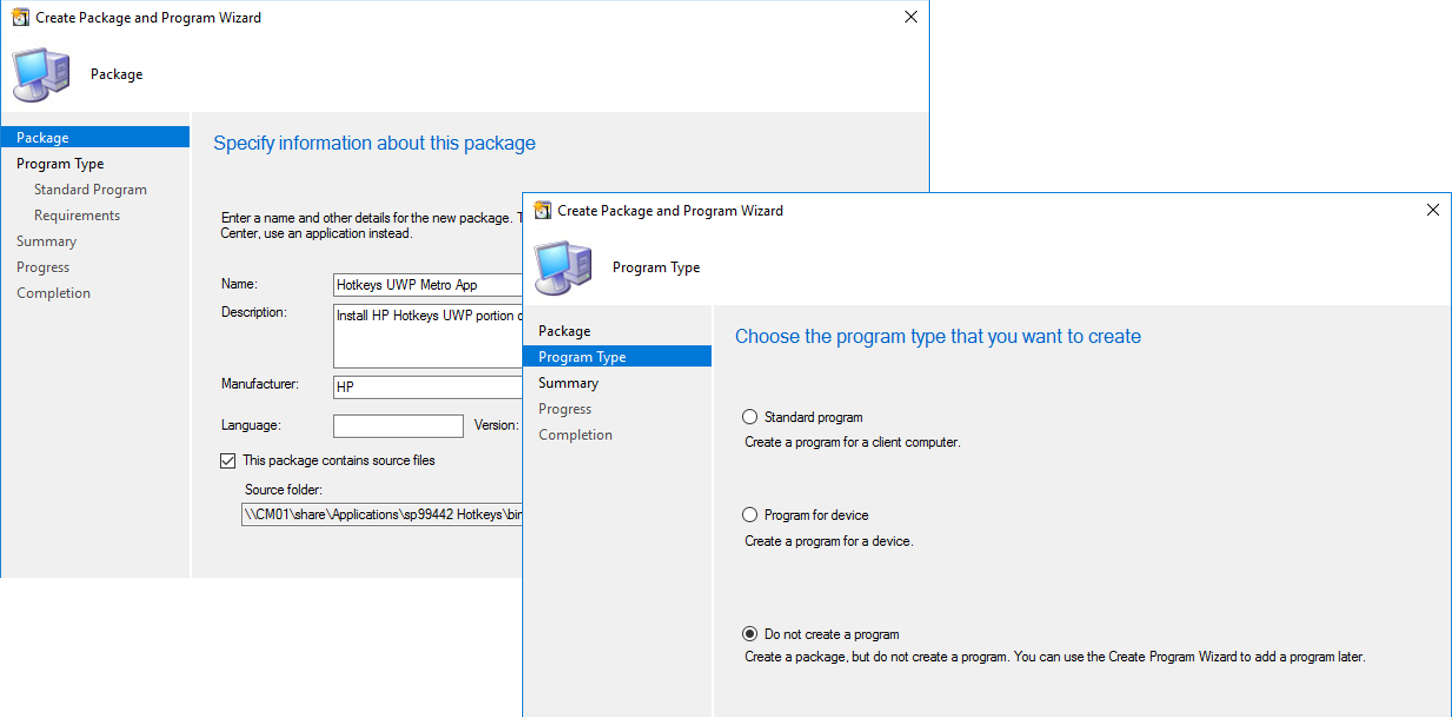
Step 4: Create OSD Task step to deploy the UWP appx package
-
Add a Run Command Line step a) after the Image Apply step and b) prior to a System Restart
-
The command line should have %OSDTargetSystemDrive% as a runstring option
- Point to the UWP package created (here it is PS100140)
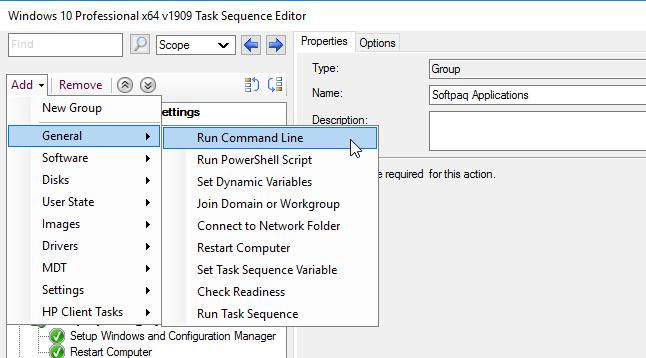

Step 5: Develop a MEMCM Package for the Software application to be installed outside the standard DriverPack injection
- Point the Package to the Download source folder where the install command is located
- Select: Do not create a Program
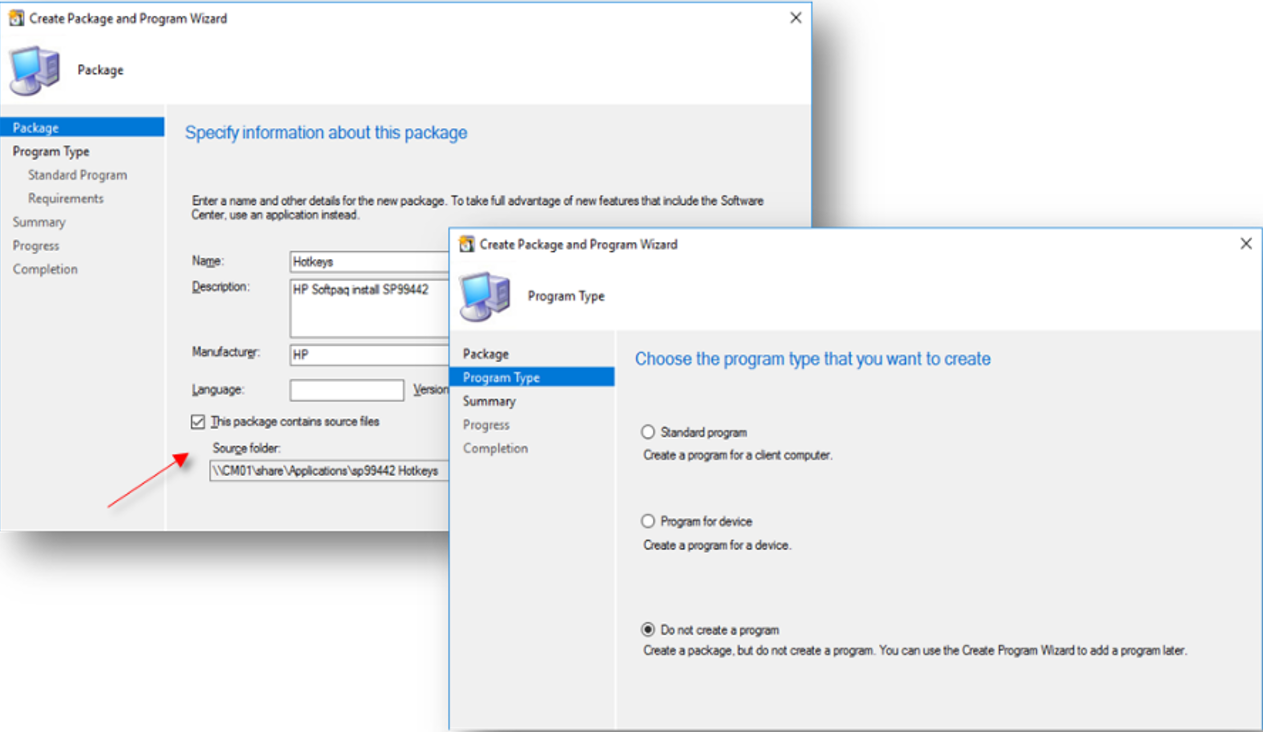
Step 6: Create an OSD Run Command Line step after 1st reboot
- Run the install command in this step

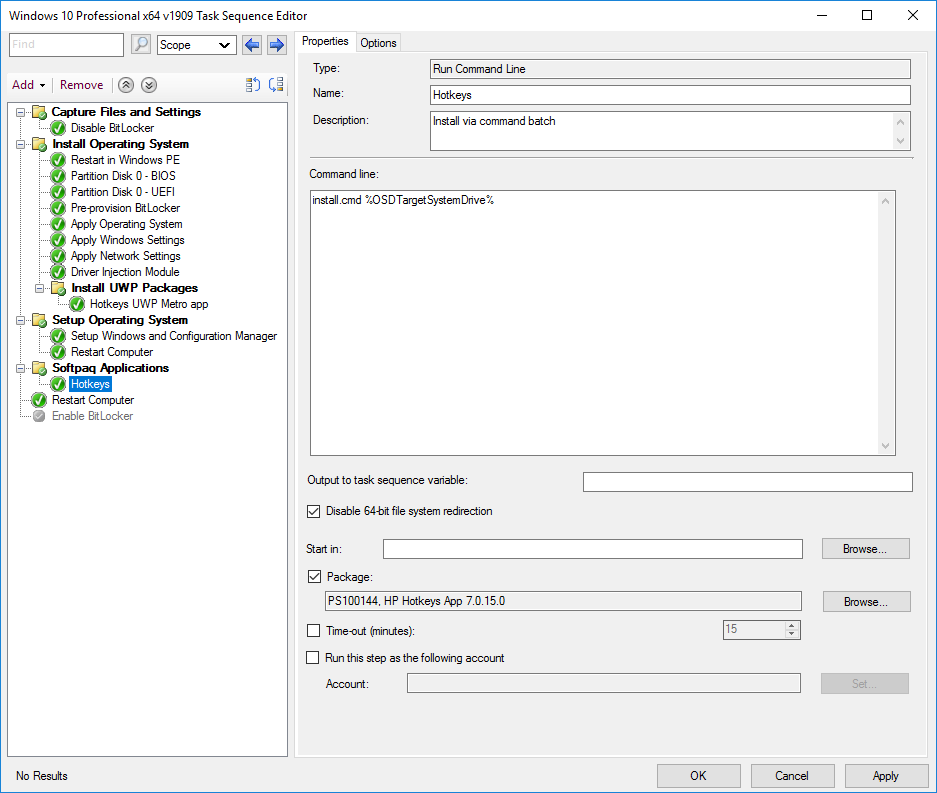
Finally, you will get to show something like this in your OSD Task Sequence

Synaptics Pointing Device UWP Appx Installation
Step 1: Download and unpack the Softpaq

Step 2: Find the command in the copied folder where the appx gets installed with DISM

Step 3: In MEMCM, create a Package to deliver the UWP portion of the applications
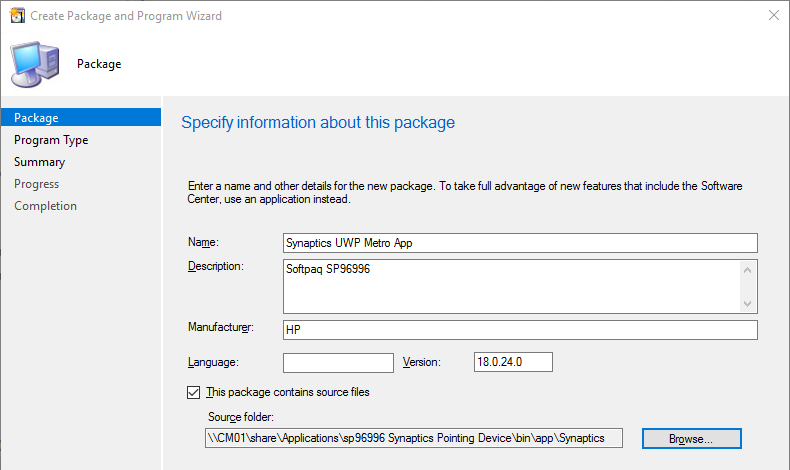
Step 4: Create OSD Task step to deploy the UWP appx package
Intel Thunderbolt UWP Appx Installation
Step 1: Download and unpack the Softpaq
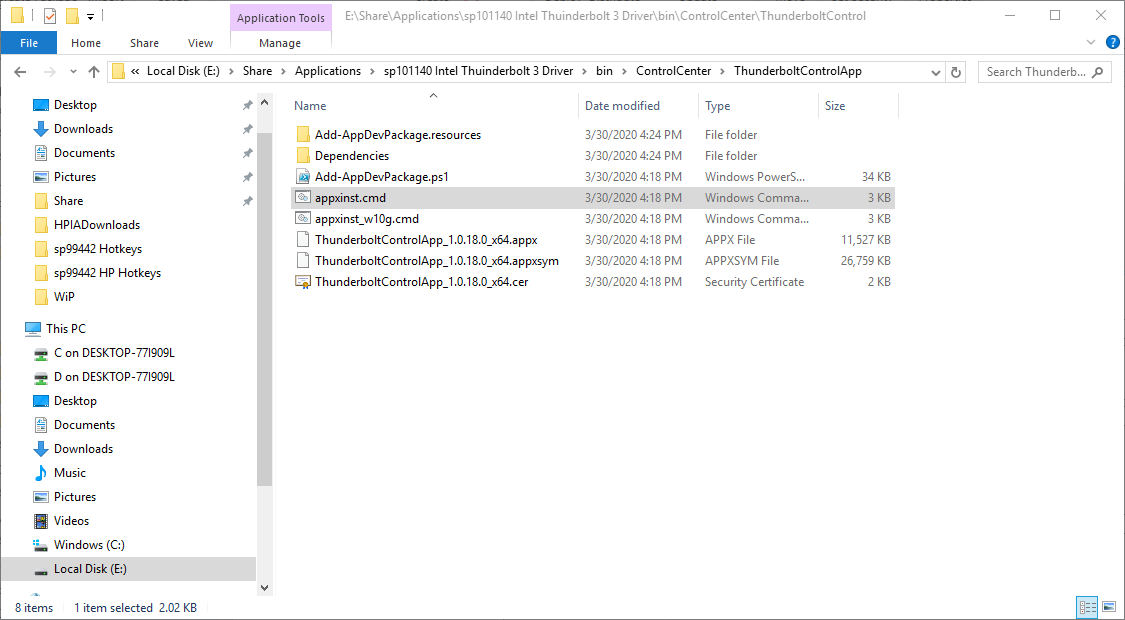
Step 2: Find the command in the copied folder where the appx gets installed with DISM
Step 3: In MEMCM, create a Package to deliver the UWP portion of the applications
Step 4: Create OSD Task step to deploy the UWP appx package
by Dan Felman - (Original work by Cam Cnare – HP Technical Consultant)
DISM Documentation:
Dism /Image:C:\test\offline /Add-ProvisionedAppxPackage /FolderPath:c:\Test\Apps\MyUnpackedApp /CustomDataPath:c:\Test\Apps\CustomData.xml

Dism /Online /Add-ProvisionedAppxPackage /PackagePath:C:\Test\Apps\MyPackedApp\MainPackage.appx /DependencyPackagePath:C:\Test\Apps\MyPackedApp\Framework-x86.appx /DependencyPackagePath:C:\Test\Apps\MyPackedApp\Framework-x64.appx /LicensePath:C:\Test\Apps\MyLicense.xml

Dism /Online /Add-ProvisionedAppxPackage /FolderPath:C:\Test\Apps\MyUnpackedApp /SkipLicense

dism.exe /Add-ProvisionedAppxPackage
      {
      /FolderPath:<App_folder_path>
      [/SkipLicense\]
      [/CustomDataPath:<custom_file_path>]
      /PackagePath:<main_package_path>
      [/DependencyPackagePath:<dependency_package_path>]
      {[/LicenseFile:<license_file_path>] [/SkipLicense\]}
      [/CustomDataPath:<custom_file_path>]
      }
      [/Region:<region>]
This may be able to be simplified with PowerShell, which is not explored in the review above. Some of the commands that can be used to install appx (or appxbundle) packages is listed below
PowerShell Appx provisioning cmdlet:
Add-AppxProvisionedPackage
   [-FolderPath <String>]
   [-PackagePath <String>]
   [-DependencyPackagePath <String[]>]
   [-LicensePath <String>]
   [-SkipLicense]
   [-CustomDataPath <String>]
   -Path <String> | -Online
   [-WindowsDirectory <String>]
   [-SystemDrive <String>]
   [-LogPath <String>]
   [-ScratchDirectory <String>]
   [-LogLevel <LogLevel>]
   [<CommonParameters>]


