The Workpath Platform
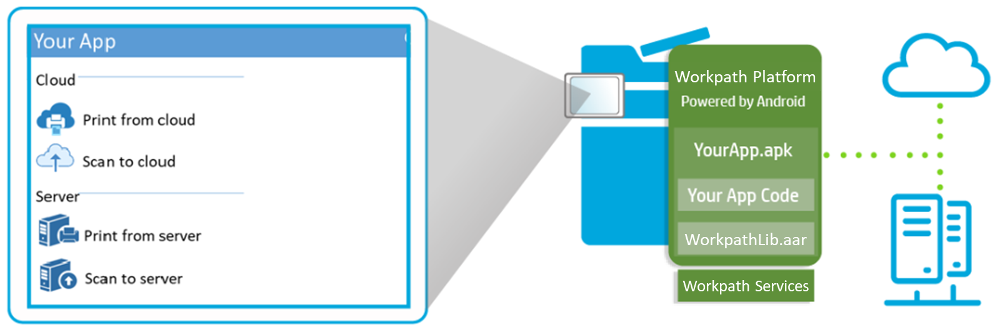
The Workpath Platform lets you install your app on an HP printer, where users will launch and use your app right from the device's control panel. Your app will use the Workpath library to utilize the scanning, printing, and other functions of the device.
You will develop your app using many of the same tools and technologies you already use to develop Android mobile apps. The device even supports remote debugging using the Workpath (Link) Debug Bridge (a version of ADB).
This page covers the following topics:
- SDK Installation and Setup
- Enabling the Workpath (Link) Platform
- Enabling the Workpath (Link) Debug Bridge (LDB)
- Installing and Debugging Your App
- UI Switching
- UI Style Guide: Tailoring Your App for HP Devices
SDK Installation and Setup
Developing Workpath applications requires installation of the following prerequisites:
- SDK
- MinSdkVersion API 19
- IDE (Integrated Development Environment):
- Android Studio 2.0.0 or above (Refer to http://developer.android.com/sdk/index.html#Requirements to set up the development environment)
- JDK (Java Development Kit):
- JDK 1.8 or higher
To use the Workpath API, you must import the the Workpath library (the WorkpathLib.aar located in Libraries folder of the SDK) and compile the project.
After downloading the SDK from the Downloads page and unzipping the SDK to your hard drive:
- Select ‘project’ type > paste the WorkpathLib.aar file in the libs folder of your project
- Right click on WorkpathLib.aar, click on Copy path > Copy absolute path, then Select File > Project structure
- Select Declared Dependencies > click on ‘+’ icon > ‘JAR/AAR dependency’
- Paste the path of the AAR copied earlier, set configuration as ‘implementation'
- Click OK, APPLY, OK, and wait for Gradle sync to complete

Enabling the Workpath (Link) Platform
The Workpath Platform is not enabled by default. To enable it, follow these steps:
A. Check the list of compatible devices to be sure your device supports the Workpath Platform
B. Upgrade the device to the latest firmware
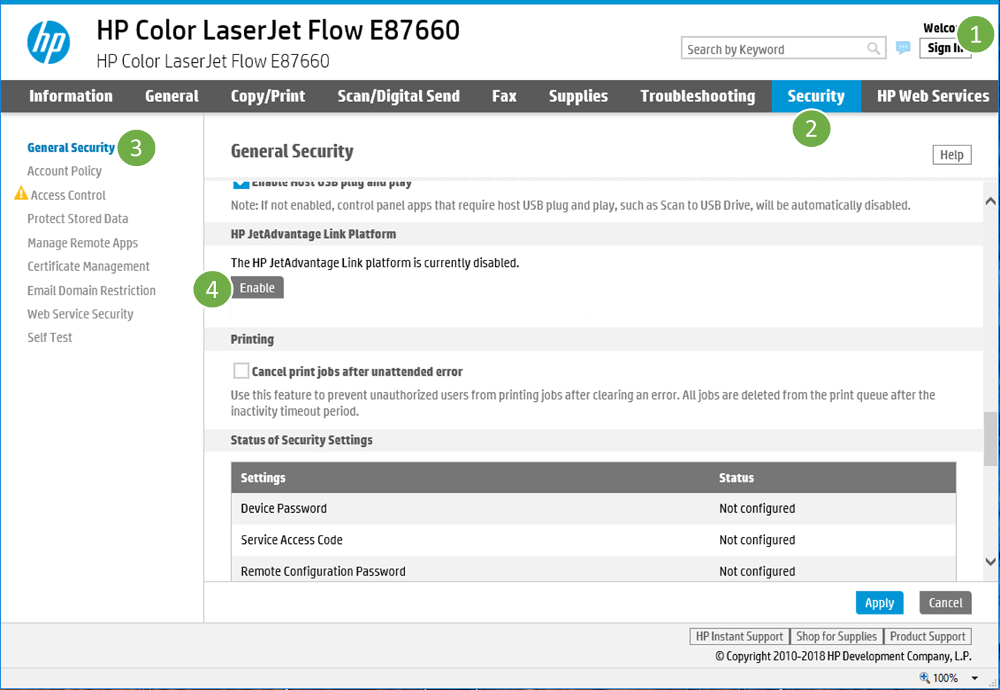
C. Enable the Workpath Platform using the device's EWS as follows:
- Sign in
- Navigate to the Security Tab
- Navigate to the General Security page
- Click on the Enable button in the Workpath (Link) section of the page
- Click Restart at the bottom of the displayed page

Enabling the Workpath (Link) Debug Bridge (LDB)
The Workpath (Link) Debug Bridge (LDB) is a version of ADB. It allows you to install and debug your unsigned app on a device over the network from within Android Studio:
adb connect <device_ip_address>:5555
Warning: As a security measure, when enabling/disabling LDB, any currently installed apps will be automatically removed.
Note: As a security measure, the App Gallery will be disabled while LDB is enabled.
To Enable LDB, follow these steps:
A. Create a personal LDB Service Key on the LDB Service Key page
B. Connect your device to a network with internet access
C. If required by your networking environment, use the EWS to configure the device to use your web proxy (See instructions here)
D. LDB can only be enabled from the device's control panel. Enable LDB as follows:
- Sign into the device as an administrator
- Swipe left until you see the Settings app
- Click on the Settings app
- Click on Developer Options
- Click on Workpath (Link) Debug Bridge
- Click on Enable
- When prompted, enter your developers.hp.com account name (Username) and your LDB Service Key (Password)
Note: If the Workpath platform is not already enabled, it will be automatically enabled when LDB is enabled. If LDB is later disabled, the Workpath platform will remain enabled.
Note: As a security measure, the Workpath (Link) Debug Bridge menu cannot be accessed/enabled from within the Embedded Web Server.
Note: For your convenience during development, the Android Settings App is available in LDB mode. However, any changes made in the Android Settings App will not actually change the device's settings.

Installing and Debugging Your App
There are two ways to install your unsigned app on a device:
- Using the HPK tool
- Using LDB and Enhanced Debug Experience (EDX) Mode
Using the HPKTool
Any app intended for use on any HP device must be specially packaged (HPK file), submitted to HP for verification and validation (VAV), and finally signed by HP before it can be installed on a device (without LDB enabled). The SDK contains an HPKTool to make it easy to package your app in an HPK. A HPK file includes your signed APK and provides app-related information not present in a standard APK file. A HPK file intended for VAV and publishing must include the signed/release version of your APK. (Note: The APK must be signed using a V2 or V3 Signature.)
When used with a device where LDB is enabled, the HPK tool will allow you to install your unsigned HPK so you can test out the process before submitting your HPK to HP for VAV. Once installed, a button will be created on the device's control panel. (Note: You may need to press reset on the control panel before the button will appear.)
Once installed, you can launch your app from the front panel or from the adb console.
Using LDB and Enhanced Debug Experience (EDX) Mode
You can install your APK using LDB:
adb connect <device_ip_address>:5555
adb install <path_to_apk>
Note: Due to optimizations made by Android Studio for Instant Run, you cannot simply copy a debug APK out of Android Studio and install it. You must use either an APK generated from the command line or one specifically built using the “Build APK(s)” command from Android Studio’s “Build” menu. Release APKs will always work.
In normal mode, the Workpath Platform does not expose its own launcher. Instead, HP devices switch to the Workpath Platform when an app is launched and switch back when the app is closed. So when installing over LDB, you will not be able to launch your app directly from the HP home screen.
For your convenience, we have provided an Enhanced Debug Experience (EDX) mode that enables you to access the Workpath Platform's launcher just for app development. To turn on EDX mode, run the following command:
adb shell set_edx -v true
Note: With early firmware versions (prior to FS4.9), you will need to use one of the following variations of the adb command:
- adb shell /system/bin/set_edx -v true
- adb shell sh /system/bin/set_edx -v true
When EDX mode is enabled, a new "Launch Workpah (Link) Home" button will appear on the control panel to allow you to access the Workpath Platform launcher and from there launch your app:

You will also be able to load and debug your app using Android Studio's Instant Run functionality.
If you are debugging/testing with long breaks and need to disable the automatic UI timeout, you can establish a wake lock by running the following command:
adb shell set_edx -awake true
To disable EDX mode, run the following command:
adb shell set_edx -v false
Note: Disabling EDX mode will automatically release the wake lock.
To see all available options, run:
adb shell set_edx -help
UI Switching
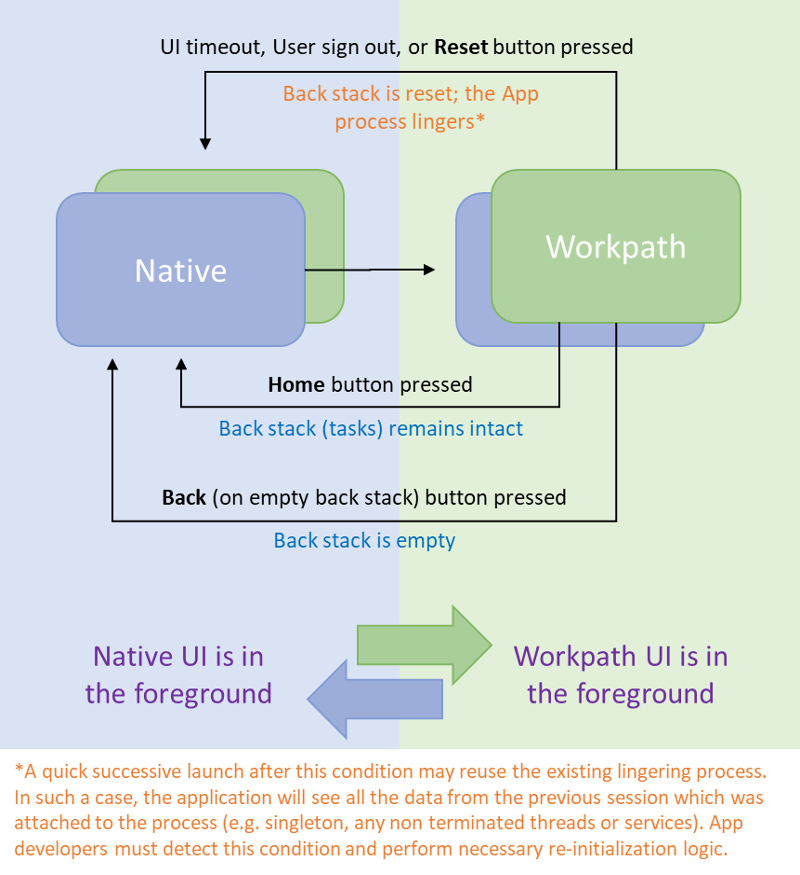
A Workpath app is represented as a button on the built-in (native) home screen. When that button is pressed, the device switches to the Workpath platform and launches the app. At this point, the app has the same UI abilities as android apps running on other platforms.
When the app is closed (by navigating back or by pressing home button), the device switches back to its native home screen. By design, apps are not expected to clear user session data on these transitions. This allows users to exit and reenter the app without losing their place.
The app can also be automatically closed by a reset condition (UI timeout, forced user sign-out, etc.) all of which also end the current user session. By design, apps are expected to clear user session data on these transitions.
It is important for you to understand these transitions, so you can implement your app appropriately. Please refer to the following diagram:
UI Style Guide: Tailoring Your App for HP Devices
HP device control panel sizes differ from panel sizes commonly found on mobile devices, so you may need to adjust your screen layouts to look their best on these panel sizes.
For example, there is a specific recommended HP home screen icon size for each control panel size. The following table lists the HP device control panel sizes and their respective display densities and recommended HP home screen icon sizes:
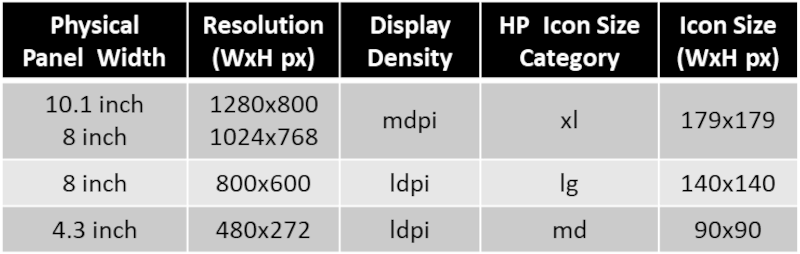
Include HP home screen icons as HP icon size category-specific drawables in your APK (e.g. res/drawable-lg/ic_hplauncher.png).
To help you, we have provided a comprehensive UI Style Guide.