HP Image Assistant (HPIA) has become a useful tool for IT shops helping to automate the deployment and updating of PCs in an Enterprise. HPIA can be used to (not-including capabilities such as, quick access to Readme and CVA files, Advisories and Bulletins, etc.):
- Update any and/or all HP deliverables to a supported platform
- Create new, platform-specific driver packs
- Deliver up to date drivers and other needed components during imaging
- On-going update of managed PCs
Because HP Image Assistant does not required to be installed and can run from a folder, in this blog, we will show how to use a similar process to deploy new, updated, Softpaqs. This is a task that, often, falls thru the cracks at enterprises, and may not have established processes for. The need, however, comes up when security updates or maybe problem resolution requires quick deployment of a driver, or BIOS. By maintaining a clean, up to date repository of HP Softpaqs, HPIA could be run on a schedule to update client devices.
This blog proposes methods to make the update process available from a client PC's MEMCM's Software Center. If the package is deployed as 'Required', the task would be enforced by the Config Manager's agent and run as scheduled.
As discussed in the blog HP Image Assistant and HP CMSL, this is the process for including the HP Script Library modules to PowerShell:
Adding the CMSL to PowerShell
NOTE: Obtaining the CMSL from the Microsoft PowerShell gallery requires the use of the PowerShellGet module. If it needs installed, you can follow these steps to set it up (in PowerShell as Administrator):
PS> Install-PackageProvider -Name NuGet -Force # make sure Package NuGet is up to date
PS> Install-Module -Name PowerShellGet -Force # install the latest version of PowerSHellGet module
Exit your PowerShell command window and open a new one, also as Administrator - This seems to be a critical step, or you will see errors loading the HP CMSL.
The CMSL can be installed directly into PowerShell from the PowerShell Gallery (as the preferred method):
PS> Install-Module -Name HPCMSL
Documentation for the CMSL is hosted here.
The first step is to set up the Repository and include the needs of Image Assistant.
Creating a Repository
Detailed Repository creation and maintenance steps are documented at the blog HP Image Assistant and HP CMSL. Note the critical step being an invocation of Set-RepositoryConfiguration to provide support for HP Image Assistant's offline mode. Execute the commands in Powershell from the Repository folder, after the Initialize-Repository command:
Initialize-Repository        # Create the folder structure required by the CMSL for Softpaq management

Set-RepositoryConfiguration -setting OfflineCacheMode -Cachevalue Enable   # set up HPIA compatibility
Follow the guidance at the blog and configure your repository for the systems you are supporting. Add repository Filters for drivers, bios, software, in any combination - as wanted for client updates.
After the Softpaq repository is available, develop a PowerShell script that will be pushed to the client and run as either a Package with a Program or a Task Sequence from the Software Center (if set as Available), or run automatically (if set as Required)
The Script
The following script can be a starting point. Notice that prior to running HP Image Assistant, the script does some sanity checks to confirm access to the repository share and to make sure some of the HPIA required components exist, like the .repository subfolder and other content. It also posts basic info to a log file on the client. You can develop your own logging information about the deployment, and also configure where the script log file should be.
The "/SoftpaqDownloadFolder:C:\HPIA" option can be modified to point to a desired location on the client (e.g. C:\...) or the server (e.g. ..\share\...)
# HPIA script - by Dan Felman/HP Technical Consultant
# v1.0 initial release
# v1.1 copy HPIA logs to share - 4/29/2020

$CMShare = "\\CM01\share\softpaqs"
$HPIARepoShare = $CMShare+"\REPOSITORY"              # location of the HP IA repo
$HPIALogsShare = $CMShare+"\REPOLogs"                # ... where the logs will be cpied to
$HPIADownloadPath = "C:\HPIA"                        # Softpaq downloads will go here... can be removed afterwards
$HPIALogsPath = $HPIADownloadPath+"\Logs"            # where will HPIA put the logs on the client
$thisPC = hostname

# Create a date log file
if ( !(Test-Path $HPIALogsPath) ) { MD $HPIALogsPath }
$ScriptLog = "$($HPIALogsPath)\scriptdateandroot.log"
'Script execution Start='+(get-date) | Out-File $ScriptLog
'$PSScriptRoot Path='+$PSScriptRoot | out-file $ScriptLog -Append  # find where the script runs from

# basic checks on the repository
if ( !(Test-Path $HPIARepoShare) -or `
    !(Test-Path "$($HPIARepoShare)\.repository") -or`
    !(Test-Path "$($HPIARepoShare)\.repository\cache") -or`
    !(Test-Path "$($HPIARepoShare)\.repository\mark") ) {
    'Can not access Repository share, or share not properly configured for HPIA' | out-file $ScriptLog -Append
} else {
    'Repository share is accessible, and is structure compatible with HPIA' | out-file $ScriptLog -Append
}
# make sure the Run PowerShell Script TS Step starts at the HP IA folder

start-process -FilePath ".\HPImageAssistant.exe" -ArgumentList `
    "/Operation:Analyze",`
    "/Action:Install",`
    "/Selection:All",`
    "/Offlinemode:$HPIARepoShare",`
    "/SoftpaqDownloadFolder:$HPIADownloadPath",`
    "/ReportFolder:$HPIALogsPath",`
    "/Noninteractive",`
    "/Debug" `
    -Wait

'Script execution end='+(get-date) | Out-File $ScriptLog -Append

# finally, copy the HPIA log file(s) to the server share
if ( !(Test-Path "$($HPIALogsShare)\$($thisPC)") ) { MD "$($HPIALogsShare)\$($thisPC)" }
Copy-Item "$($HPIALogsPath)\Readme*.html" -Destination "$($HPIALogsShare)\$($thisPC)"
Copy-Item $ScriptLog -Destination "$($HPIALogsShare)\$($thisPC)"
My script is named StartHPIA.ps1 and will be located in a share folder '\\CM01\share\Applications\Scripts', where my scripts are kept. The script can also be copied to the HPIA folder, then run from same location as the application.

We will highlight 2 different methods for packaging HPIA in MEMCM.
Method 1. HP Image Assistant Package with built-in Program
Here, the package can be deployed with the associated Program to a device collection, as Available or Required
Create the package and point the Source folder to the HP IA share, as seen in the picture below:

On the next dialog, for the Program Type, select the default ‘Standard program’ and click Next. Fill-in the name, and for the Command line, type:
Powershell.exe -ExecutionPolicy ByPass -File \\CM01\share\Applications\Scripts\StartHPIA.ps1
Note: i maintain scripts in a common 'scripts' folder. If the script is copied to the HPIA folder, the Command line could be simplified as:
Powershell.exe -ExecutionPolicy ByPass -File .\StartHPIA.ps1
For the Startup folder, use the HPIA share – in this example:
\\CM01\share\Applications\HPIA 4.5.4.1
Run mode should be with ‘Administrator rights’ since we will be installing system drivers.
You can enable ‘Allow users to view and interact with the program installation’ if you want to see HPIA's execution steps on the client.

Distribute the Package to the Distribution Points, or, If making modifications, Update Distribution Points.
Finally, Deploy the Package to the appropriate Device Collection

In a few minutes, once the MEMCM Client syncs with the Management Point, the HPIA program will be available in the Software Center. Of course, you could deploy this as Required, and the package will execute on your schedule.
Method 2. HP Image Assistant Package in a Task Sequence
With the HPIA developed script, create a package in MEMCM

Populate the fields, pointing the Source folder to the scripts share (or the HPIA share if it resides on the same location)

On the next screen, select ‘Do not create a program’, and finish creating the Package. Distribute the package to the Distribution Point(s), or select Update Distribution Points when making changes to the package.

Task Sequence
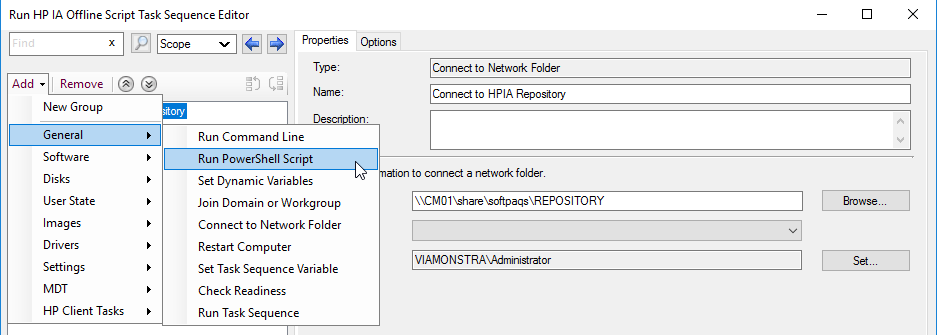
The Task Sequence will have two steps, Connect to the Repository share, and Run PowerShell Script. The first step is not absolutely required (since the script already check that, and yours may not), but is always good practice.
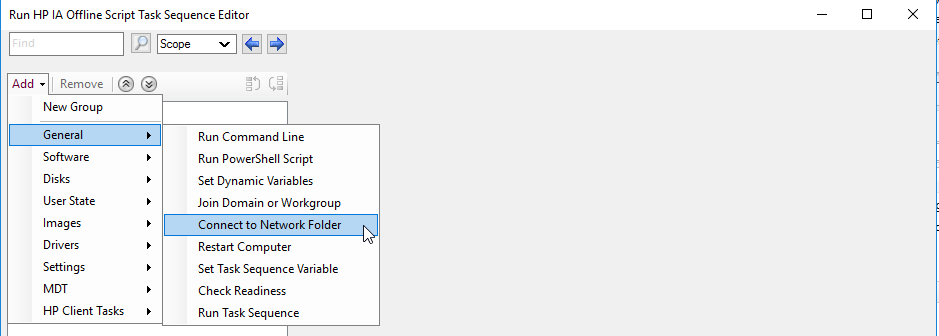
The connect to share step is simple. Select Add, General, Connect to Network Folder.
Make sure to use an appropriate account.

Next add a Run PowerShell Script step, and In the dialog, name the Step, Select the HP IA script Package we created above, add the script name (in our case StartHPIA.ps1) and for Start in: 'Browse' to the share folder where the HP Image Assistant application is located (here it’s “\\CM01\share\Applications\SP101503 HPIA 4.5.4.1”).
Recall that the script package already points to the scripts share. We need the script to start on the HPIA folder because our script uses “-Path .\HPImageAssistant.exe” to run the application, expecting it to be located in the ‘current’ location. This can be changed of course, if needed

Finally, Deploy the Task Sequence to the correct client devices Collection. Select ‘Available’ at Deployment Settings step - to have it accessible from the MEMCM Software Center.

Within a few minutes, on the client device, the Software Center will show the Task Sequence application

When the user selects the Task Sequence, HP IA will run and update anything available from the Repository, if needed.
If in the Deploy Software Wizard, the ’Required’ option is selected, the Task Sequence will run in the schedule supplied, or if set to As soon as Possible, whenever the agent syncs up with the server. Syncing can be sped up on the client device by going to the Options menu, then Computer Maintenance, and selecting Sync – handy for testing changes of the script package.
NOTE: This can take a couple of minutes or more to show as available, or to be able to Rerun the Task
Written by Dan Felman/HP Technical Consultant 4/20/2020