3. Templates & Triggers
Overview
This article explains how to view, create and edit templates and Triggers in Site Flow Light.
When Templates are created, they can be added to a trigger to automate steps in the production process.
NOTE: This is the third article of this series, and follows Linked accounts & Paired products.
Table of contents
- Templates
- Creating a template
- Viewing a template
- Editing a template
- Triggers
- Creating a trigger
- HTTPS type
- Email type
- Viewing triggers
- Editing triggers
Templates
Creating a template
Select SETUP > Create Template to add a new custom template to your account.

Enter the Template Name, the Extension which is amended to the template Name, and the template MIME Content Type.
The content type can be application/json, text/xml, text/plain, or text/html.

Turn the Active switch ON / OFF to activate/de-activate your template.

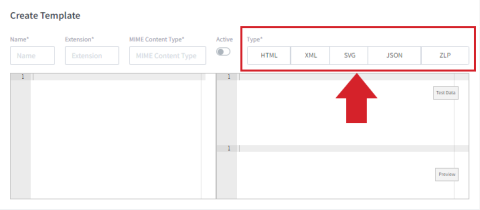
Select the format of the trigger from the Type options: HTML, XML, SVG, JSON, or ZPL.
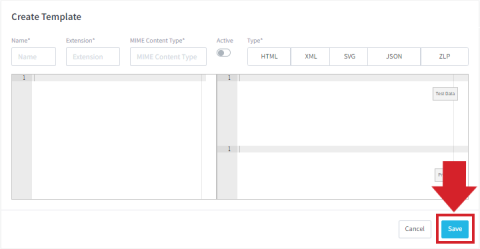
Enter the template into the first box on the left.

Copy the sample payload corresponding to the template type from the Handlebar document (attached below) in the Test Data box.

You can view the generated template in the Preview box.

Click Save when done to save all your changes.
Important Tip: New or amended templates will only be applied to new orders.
Viewing a template
Click SETUP > View Templates to see a list of your templates, listed in alphabetical order.
Also, Select Active or Inactive on the top right to filter through the available triggers based on their status.

Editing a template
Select any template you wish to view or edit from your list.
Follow the same process as outlined above when adding a new template.

Triggers
Triggers are the events that activate the templates in your account. Triggers are an effective way to notify print buyers or PSPs when certain events take place and can include shipment shipped, shipment updated, order cancelled, order errored, account update, or station update. The list can be customized, and new triggers added where required.
Triggers can also be added directly to a source account, which is useful if the brand is contracted with multiple PSPs.
Find out how to view and create triggers that can control and activate your templates.
Creating a trigger
Select SETUP > Create Trigger to add a new trigger to your account. Turn the Active switch ON to activate your trigger and enter the Name of the trigger.
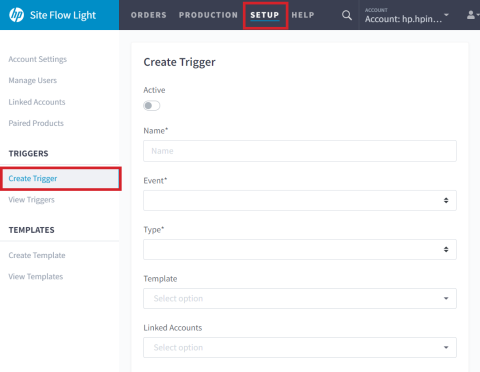
Select the Event from the drop-down to choose what event will activate your trigger.
Event names and descriptions are found below in Table 1.
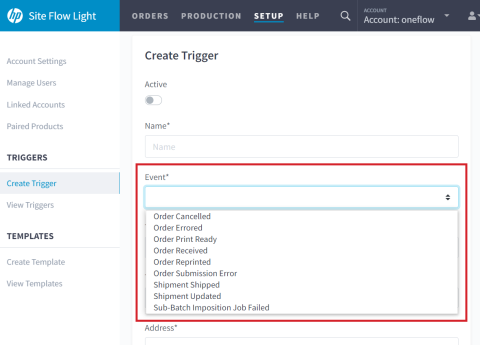
Table 1
| Event Name | Event Description |
| Order Cancelled | The order has been cancelled by the brand or the end consumer. |
| Order Errored | The artwork is not available, due to either a pre-flight failure or an invalid fetch URL. An order will go to error 12 hours after order submission. |
| Order Print Ready | The artwork has been successfully retrieved and the order is now ready to enter production. |
| Order Received | The order has been accepted by the system, but the artwork has not yet been retrieved. |
| Order Reprinted | A component, item, or order has been reprinted. |
| Order Submission Error | An order submission error has occurred. |
| Shipment Shipped | A shipment has been shipped. |
| Shipment Updated | A shipment of a live order has been updated. |
Select the Type for your trigger: an HTTPS postback or email.

HTTPS Type
The following fields appear at the bottom of the page when you select HTTPS.

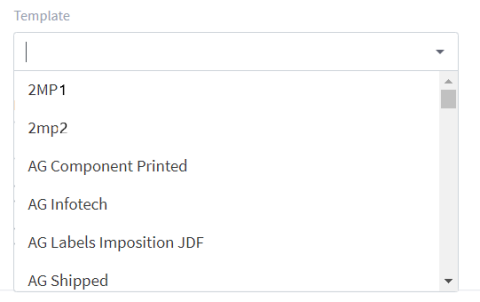
Select an existing Template from the drop-down menu.
Enter the destination URL address for the HTTP / HTTPS Request.
NOTE: When you POST to an HTTP / HTTPS endpoint, you must use an open URL that does not contain login credentials. However, a static token can be included either in the header or the body of the payload to be validated upon entry into the system.

Select the Method from the drop-down: POST, PUT, or GET.

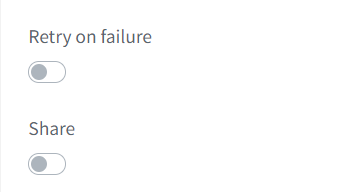
Select Retry on failure to retry the trigger in the case that a server-side issue causes it to fail. The trigger will retry 6 minutes after the initial failure, then 15 minutes after the second attempt, and 30 minutes after that. A final retry will be attempted 24 hours after the initial failure.
Select Share if you are configuring triggers for the brands submitting to you. Triggers should be shared so that the brand can view the Postback.
Fill out the Header and Value fields for your request (such as account authentication).
When you click the + button to the right to add the header, you will see it greyed out below. You may repeat this step and add as many headers as necessary for your request, and delete them by clicking the X that will appear next to it. .

Click the Linked Account drop-down and select from the list (if you have linked to an account before).
NOTE: Linked accounts are not supported for Sub-batch events, since batches can include items from multiple sources/ accounts. The Sub-batch event triggers are only intended for the PSP to get updates on the Sub-batch production events e.g., to send updates to the HTTPS endpoint of their MIS system.

Click Save to finish creating the new trigger.
Email Type
The following field appears at the bottom of the page when you select Email. as your Type.
Fill out the desired email address, and the rest of fields as explained above.

NOTE: You can only add one email per trigger. In case you wish to add a second email, you should duplicate the trigger and edit the email address to the second email contact.
Select Retry on failure to retry the trigger in the case that a server-side issue causes it to fail. The trigger will retry 6 minutes after the initial failure, then 15 minutes after the second attempt, and 30 minutes after that. A final retry will be attempted 24 hours after the initial failure.
Select Share if you are configuring triggers for the brands submitting to you. Triggers should be shared so that the brand can view the Postback.
Click the Linked Account drop-down and select from the list (if you have linked to an account before).
NOTE: Linked accounts are not supported for Sub-batch events, since batches can include items from multiple sources/ accounts. The Sub-batch event triggers are only intended for the PSP to get updates on the Sub-batch production events e.g., to send updates to the HTTPS endpoint of their MIS system.
Viewing triggers
Click SETUP > View Triggers to see a list of your triggers, listed in alphabetical order.

Editing triggers
Select any Trigger to view or edit its complete details.


<< GO TO THE PREVIOUS ARTICLE: Linked accounts & Paired products || GO TO THE NEXT ARTICLE: Orders >>