
The Open eXtensiilty Platform for devices (OXPd) is an enterprise software development platform for creating device extensions and front panel document workflow applications based on standard web service and web application protocols.
Unlike other device extension platforms that require 3rd party code to be installed onto every device (often requiring custom code for each device model), OXPd centralizes the 3rd party code (called a Solution) on a Solution Server connected to the same network. The device administrator simply configures devices on the network to work with a Solution Server to provide additional functionality. Because OXPd is standard and available on a wide range of devices, large and heterogenous fleets of devices can be served with a single server implementation. And when code changes are needed (e.g. to add features or fix defects), those changes can be made once on the Solution Server and all devices immediately benefit from those changes without any intervention.
This page covers the following topics:
- Evolution of the OXPd Platform
- SDK Installation and Setup
- Enabling the LaserJet Debug Bridge (LDB)
- UI Style Guide: Tailoring Your App for HP Devices
Evolution of the OXPd Platform
The OXPd2 Platform
The OXPd2 Platform is the newest generation of OXPd, based on the latest web standards and best practices. OXPd2 is available on only the newest devices running FutureSmart 6 and later firmware versions. (See the compatible devices list for more details.) Those devices will not support OXPd1, marking the first ever compatibility break in the history of the OXPd platform. However, OXPd2 does support all the same features as OXPd1 (but using different protocols) making it is easy to support both OXPd1 compatible devices and OXPd2 compatible devices within the same Solution Server implementation.
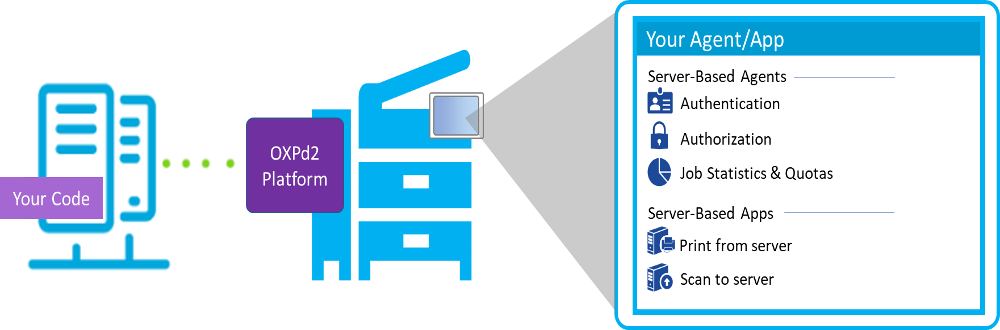
The OXPd2 Platform consists of a set of Web Services for device management and control plus an embedded Web Browser used for all front panel walkup user interactions. This enables server-based software to easily extend core device functionality (e.g. user authentication and authorization, job statistics collection and quota, etc.) through what OXPd calls Agents and to implement rich document workflow experiences through what OXPd calls Applications. Any combination of Agents and Applications can be included in a single Solution implementation deployed onto a Solution Server.
To connect a device to Agents and/or Applications, a Solution Bundle defining those Agents and Applications is constructed and installed by a device administrator onto the device. An optional Solution Context can alo be installed onto the device to provide installation-specific context such as the hostname of the customer's Solution Server. The Solution Bundle and optional Solution Context provide everything the device needs to know for it to communicate securely with the Solution Server when an action on the device requires it.
The OXPd1 Platform
The OXPd1 generation of the platform released circa 2009 and was based on the most modern web standards and practices at the time. Providing not only for for new models but also in firmware updates for many previously installed models, it quickly became the most widely available extensibility platform in the industry. It has been a standard feature in every subsequent firmware version up to and including FutureSmart 5.
SDK Installation and Setup
To use the OXPd2 SDK:
- Install any needed prerequisites.
- Download and extract the SDK and Device Simulator.
- Open the oxpd2-sdk-documentation application included in the SDK.
- Explore OXPd2 content:
Prerequisites
The OXPd2 SDK prerequisites are dependent on component and preferred language/OS. Many of the components are supported in multiple environments:
- Examples - Install all prerequisites for your desired implementation:
- .NET prerequisites:
- Microsoft Visual Studio 2022 (Professional/Enterprise) with these packages installed:
- ASP.NET and web development
- .NET desktop development
- Microsoft Visual Studio 2022 (Professional/Enterprise) with these packages installed:
- Java prerequisites:
- OpenJDK 17 (Long Term Support version)
- Gradle 7.5
- JavaScript prerequisites:
- NodeJS 18.14.2 (Long Term Support LTS version)
- Yarn
- .NET prerequisites:
- Demos - The Demos support both .NET and Java. The prerequisites are the same as the Examples.
- PullPrint with Authentication Demo
- Simple Scan Demo
- Solution Packaging Utility - This tool is strongly recommended to build your solution bundles. It requires:
- An x64/x86 machine with at least 8GB of RAM and 10GB of free disk space.
- .NET Desktop Runtime 6.
- Windows requirements:
- Windows 10 or newer.
- Windows Subsystem for Linux (WSL) 1 using the default Linux distribution.
- Note: WSL 1 is required to utilize squashfs and dm-verify in the build process.
- Linux requirements:
- Debian 9+, Ubuntu 16.04+, or Fedora 30+
- macOS requirements:
- macOS High Sierra 10.13+
- Device Simulator - The OXPd2 Device Simulator requires a workstation with:
- Intel or AMD CPU that supports virtualization
- Windows 10
- Support for virtualization enabled in BIOS.
- Hyper-V must be disabled.
- A wired network connection.
- One of the following:
Downloading the SDK
To access the SDK components:
- Download the latest SDK from the Downloads page.
- Unzip the SDK to your hard drive.
- Open the folder to explore included components.
HP Device Simulator
The HP Device Simulator is a virtualized HP device running the same firmware that will run on the next generation of HP devices. It can be downloaded and deployed using VMWare as described in the Prerequisites.
To use the HP Device Simulator:
- Download the simulator.
- Access the Device Simulator User Guide in the Tools & Utilities section of the documentation application.
OXPd2 Documentation Application
All of the functionality of the OXPd2 SDK is explained within our included documentation application. Open the documentation folder and launch the application appropriate to your OS:
- Windows - oxpd2-sdk-documentation.exe
- Linux/Mac - oxpd2-sdk-documentation.AppImage
-
Note: This file must be given permissions to execute prior to opening. This can be done by opening a terminal in the documentation folder and running the following command:
chmod +x oxpd2-sdk-documentation-x.x.x.AppImag
-
The documentation application contains a document library that provides user guides, service specifications, and implementation examples for the OXPd2 services, examples, and tools.
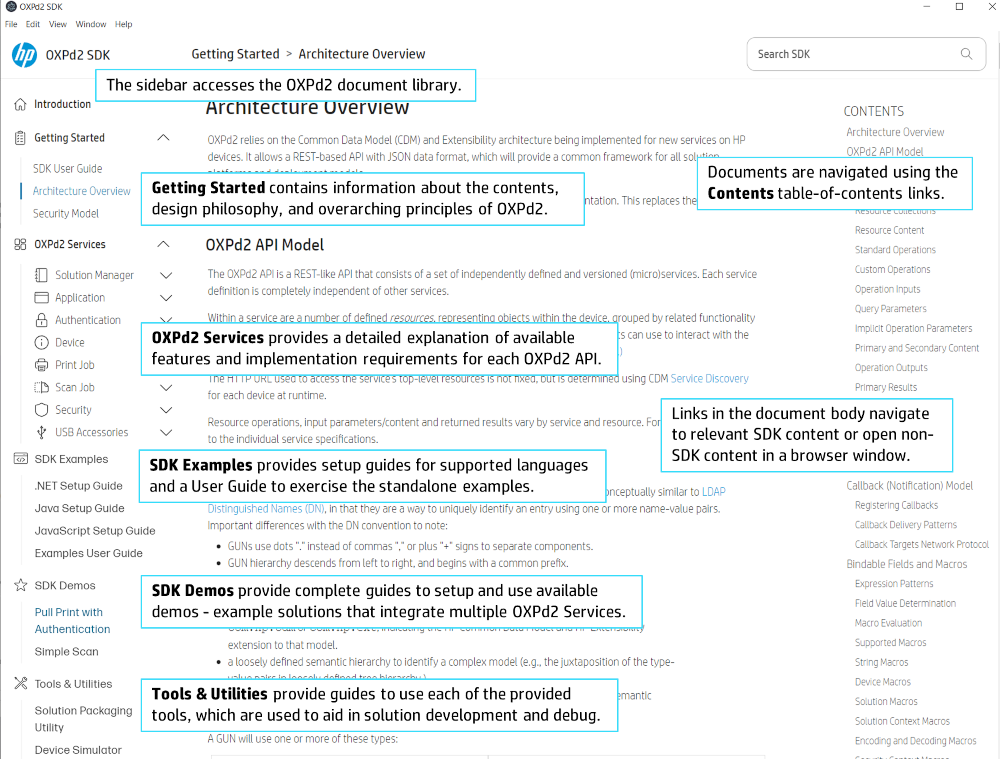
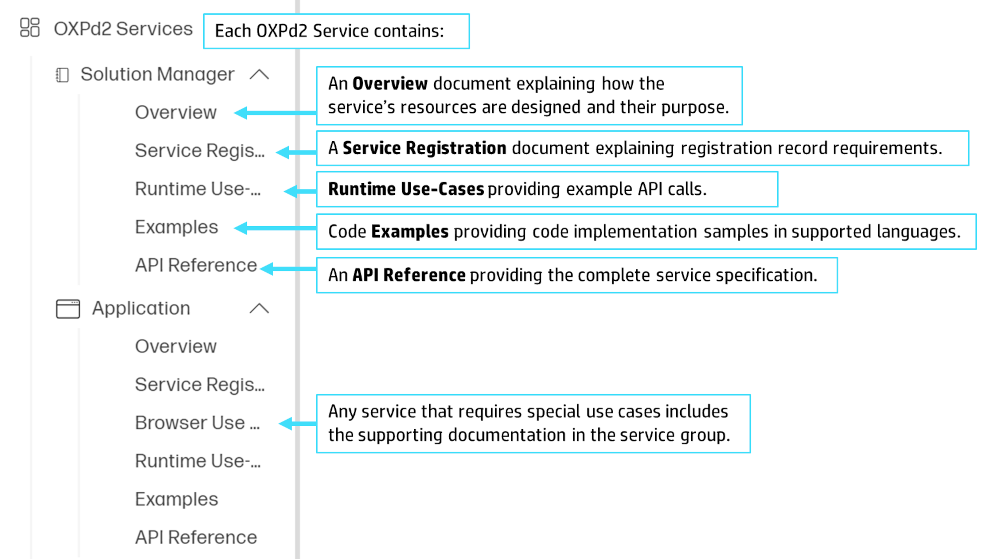
The OXPd2 Services section provides supporting documentation to understand and implement each service:
Specifications
The specifications folder contains the Open API specifications for all released services. These specifications are included in the API Reference section of the documentation application, but are available here in other formats, including:
- Redoc-standalone HTML file
- jsonschema.json
- openapi.json for the standalone service specification
- openApi.bundle.json for included types references
- ums.json
OXPd2 Libraries
The SDK includes libraries for .NET, Java, and JavaScript.
The libraries are used in the implementation of the included Example and Demo solutions.
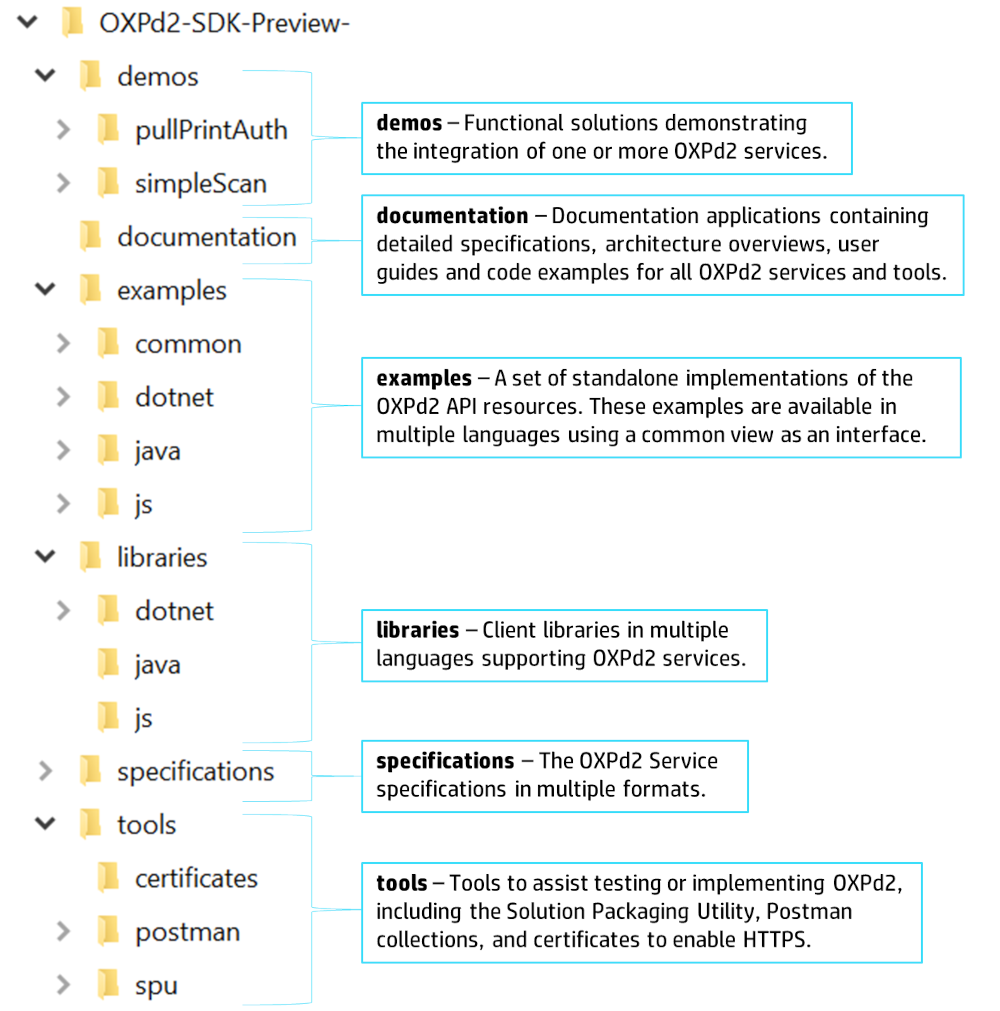
OXPd2 Examples
The SDK includes OXPd2 Examples that demonstrate implementation of many of the individual service API calls. The OXPd2 Examples consists of an application that can be hosted on a local server and then used to deploy associated solutions onto a print device.
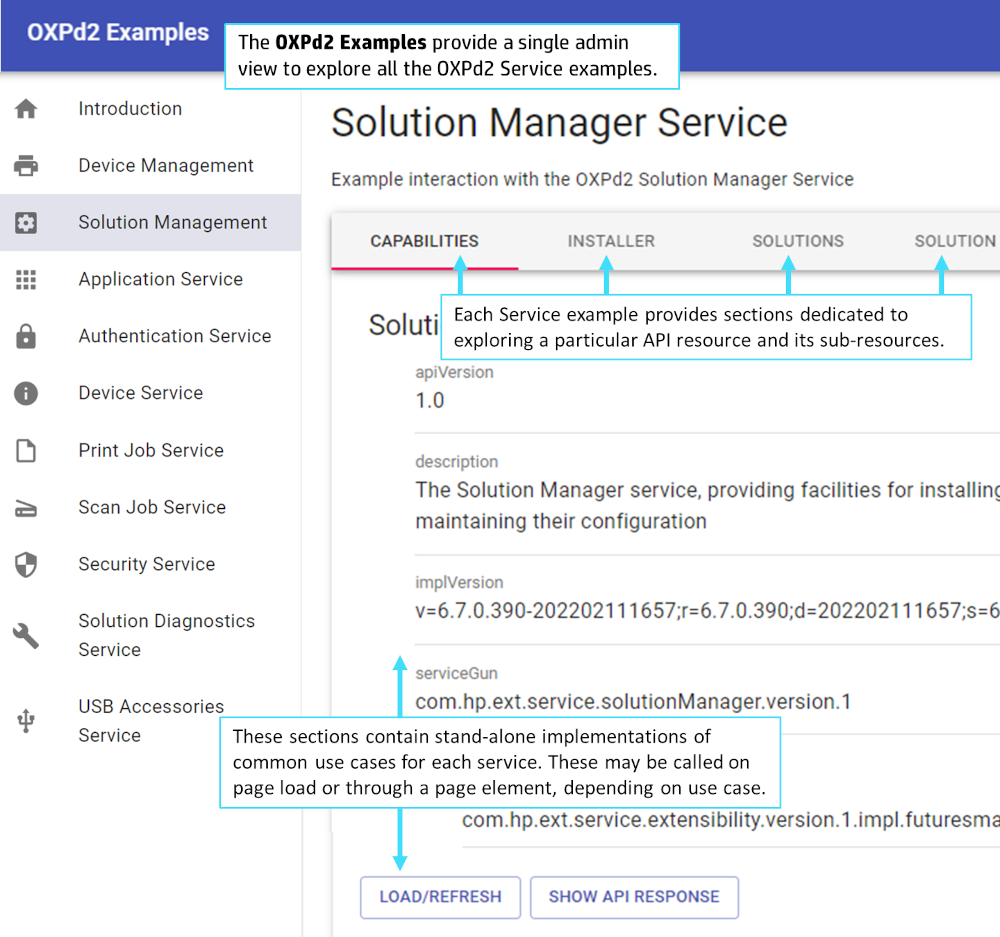
While these examples are provided as a single view, each resource is implemented independently of the rest (where possible.) .NET, Java, and JavaScript examples are available. Setup guides and a walkthrough tutorial for the OXPd2 Examples application are included in the SDK Examples section of the documentation application.
OXPd2 Demos
OXPd2 demos provide a complete example of a solution, integrating multiple OXPd2 services to focus on a more complex use case.
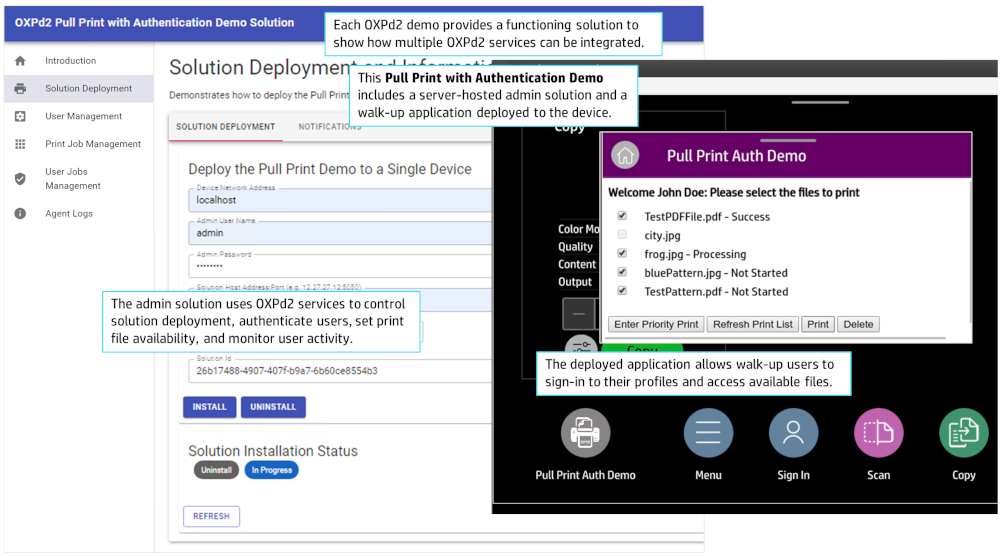
The OXPd2 SDK includes two demos:
- Pull Print with Authentication Demo allows a user to select images for print from a print file repository.
- Simple Scan Demo allows a walk-up user to launch a scan from the print device.
Both demos showcases both administrator and walk-up user functionality. A setup guide and walkthrough tutorial for each demo is included in the SDK Demos section of the documentation application.
OXPd2 Tools
The OXPd2 SDK includes additional tools packaged within the SDK to facilitate development of new solutions.
Solution Packaging Utility
The Solution Packaging Utility is used to develop new solution bundles and solution manifests. Solution projects can be saved and updated as needed, and then bundled when a release is ready so it may be verified, signed, and distributed as a ready-to-install solution bundle.
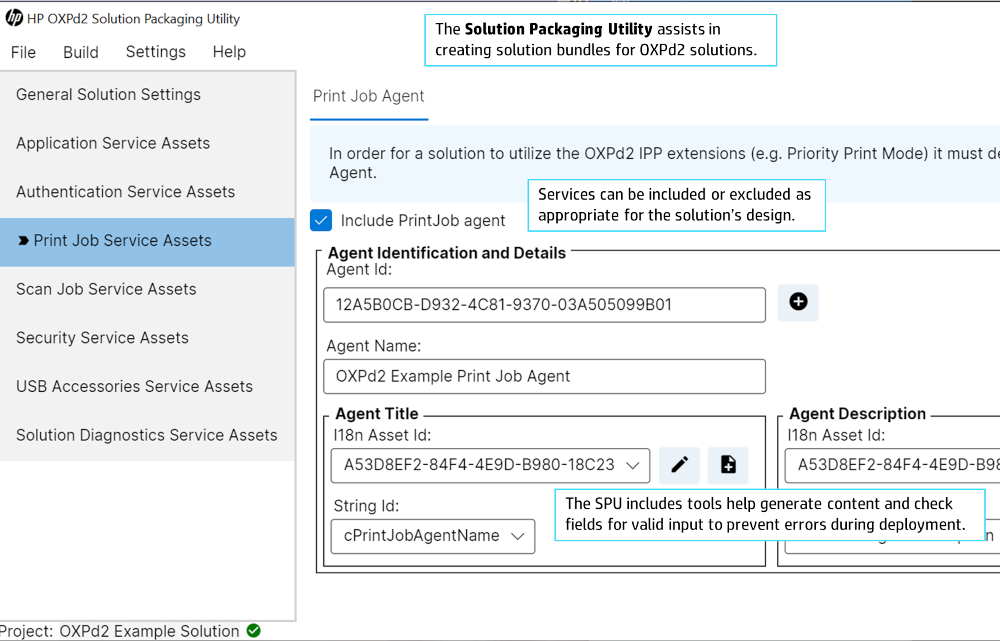
This Solution Packaging Utility is located in the "tools\dotnet\spu\spu-gui\net6\Release" folder in the SDK. Both a Linux and Windows version is available.
A user guide for the Solution Packaging Utility is included in the Tools & Utilities section of the documentation application.
Postman Collection
The Postman collection provided with the OXPd2 SDK enables a simple exploration of the APIs and operations of the SDK, as well as quick interactions with the API endpoints on the Device Simulator. This allows you to quickly determine expected responses using pre-defined API calls.
This collection is located in the "\tools\postman" folder in the SDK bundle. A Postman Collection user guide for loading and using the Postman Collection is included in the Tools & Utilities section of the documentation application.
Certificates collection
The Certificates collection provides generic certificates that can be used to enable HTTPS in development. Directions to use these certificates is provided in the relevant user documentation of supported SDK applications.
Warning: These certificates are for development and debug purposes only, DO NOT USE THEM IN PRODUCTION. The private keys for these certificates are distributed to all approved solution developers, and should not be considered secure.
Enabling the LaserJet Debug Bridge
The LaserJet Debug Bridge (LDB) allows developers to turn on advanced debugging capabilities for development purposes.
When LDB is enabled or disabled, the device will remove all solutions and associated data and reboot.
LaserJet Debug Bridge on Simulator
LDB mode can be remotely enabled on debug devices such as the Device Simulator.
To enable the LDB on the simulator:
- Complete the following steps from the Device Simulator guide located in the documentation app:
- Start the simulator.
- Note the Simulator IP.
- Complete the following steps from the Postman Collection guide in the documentation app:
- Load the Postman Collection included in the OXPd SDK tools/postman
- Configure the OXPd2 environment HOST variable to the simulator IP.
- Set the Postman environment to OXPd2 Environment in the upper right hand corner.
- Send the Enable LaserJet Debug Mode command from the UDW collection.
- The simulator will reboot in LDB mode, removing all solutions and solution data.
To disable LDB mode, send the Disable LaserJet Debug Mode command from the UDW Postman collection.
UI Style Guide: Tailoring Your App for HP Devices
HP device control panels vary in sizes depending on model, so we recommend you adjust your application's screen layouts for each model.
As OXPd2 compatible models are released, we will provide details on the control panel sizes, display densities and recommended HP home screen icon sizes. This information is also returned through the Application Service's Capabilities resource, which provides the User Interface Attributes of the print device.