Fullbleed Printing Method Number 1: Using KView or Gwenview
Fullbleed Printing Method Number 2: Using lpr
Printing on CDs and DVDs Using the Photosmart D5100
Manual Duplex Printing
Note: This was testing using OpenOffice, however this should work with any printing application that has the ability of printing only odd pages and only even pages.
-
Open the OpenOffice document to be printed
-
Click on File then Print
-
Click Options
-
Under the Section "Pages" make sure that only "Left" is selected.
Left = Even Numbered Pages | Right = Odd Numbered Pages
-
Click Ok then Print
-
The even number pages should print.
-
Once the pages have completed printing, change the order of the pages printed so that the pages on the bottom are now on the top.
Example: Printed 2 even pages from a 4 page document. Pages 2 then 4 are printed from the printer. Move page 4 under page 2.
-
Place the reordered printed document into the paper tray of the printer so that the printed side is face up, and the blank side is face down. Also ensure that the TOP of the document is going into the printer so that the text is facing the same direction on all of the pages.
-
Click on File then Print
-
Click Options.
-
Under the Section "Pages" make sure that only "Right" is selected.
Left = Even Numbered Pages | Right = Odd Numbered Pages
-
Click on Ok then Print.
-
Printer will print odd number pages now on the backside of the even pages.
Other options for manual duplex printing:
- CUPS documentation
- Selecting Even or Odd Pages using LP:
Use the -o page-set=set option to select the even or odd pages:
lp -o page-set=odd filename
lp -o page-set=even filename
- Most printing applications have a feature of printing either the odd/even pages. You could print the odd pages, reinsert the pages and print the even pages.
Fullbleed Printing Method Number 1: Using KView or Gwenview

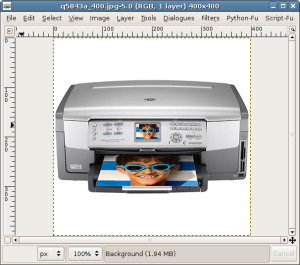
Image before scaled to correct size in GIMP
Steps:
- Open the image to be printed GIMP
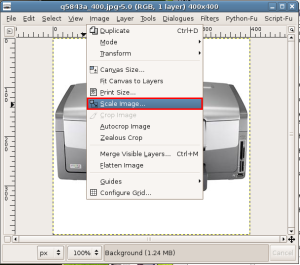
- Click the "Image" toolbar.

Image toolbar
- Click "Scale Image..."

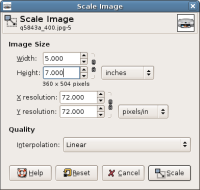
Scale Image dialog
- Click the "link" between Width and Height to break the aspect link.
- Change the "pixels" drop down to "inches"
- Change the Width/Height to the appropriate paper size (for example, Width "8.5" Height "11")
- Click "Scale", the image may change size in the GIMP viewer.

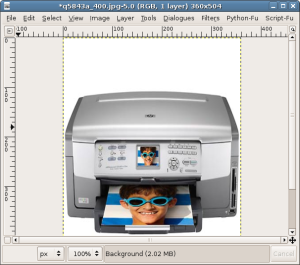
Image after scaled to correct size in GIMP
- Click File "Save as..."
- Change the "Save in Folder.." and the file name to something other than the original file.
- Click "Save"
- Dialog may appear regarding "Image Quality", change this to 100.
- Click "Ok", the image should be saved.
- Close/Exit GIMP
- Open the image using KVIEW or GWenview. (right click, open with kview, etc.)
- Click File then Print. The print dialog appears.
- Select the printer to be used to print.
- Click the "Properties" button.
- On the General tab, verify, Page Size and Orientation.
- On the Margins tab, verify, "Use custom margins" is checked. All margins set to 0.000.
- On the Driver Settings tab, verify, Page Size, and Resolution, Ink Type, Media Type. The latter option MUST be something like "1200 dpi, Photo, Full Bleed, Black + Color Cartr., Photo Paper"
- Click Ok
- Click the Image Settings tab
- Make sure "Fit image to page size" and "Center image on page" are checked.
- Click Print.
Fullbleed Printing Method Number 2: Using lpr

Image before scaled to correct size in GIMP
Steps:
- Open the image to be printed GIMP
- Click the "Image" toolbar.

Image toolbar
- Click "Scale Image..."

Scale Image dialog
- Click the "link" between Width and Height to break the aspect link.
- Change the "pixels" drop down to "inches"
- Change the Width/Height to the appropriate paper size (for example, Width "8.5" Height "11")
- Click "Scale", the image may change size in the GIMP viewer.

Image after scaled to correct size in GIMP
- Click File "Save as..."
Note: Make sure to save the filename is .ps (or postscript)!
- Change the "Save in Folder.." and the file name to something other than the original file.
- Click "Save"
- The "Save as Postscript" dialog will appear, change the "Unit" to Inches, and verify the dimensions match for the paper size you are printing to.
- Click "Ok", the image should be saved.
- Close/Exit GIMP
- Open a terminal window.
- Goto the directory where you saved the image. Example:
cd ~/Desktop
- Enter this command:
lpr -Pprinter_name filename.ps
Fullbleed Troubleshooting
- Make sure the image is scaled to the same size as the paper.
- Make sure the printer is set to fullbleed mode. This is found on the printer properties dialog or in the CUPS printer administration page.
- Make sure your printer is set to use the correct size of paper that you are trying to print on.
- Make sure the printer is set to the correct region and language.
- Make sure the print orientation is set correctly.
Special Note regarding orientation: If the page orientation is portrait, and you want to print a fullbleed 3x5 photo, make sure the photo is scaled to 3" width, by 5" height. If you wish to print the image in the landscape orientation make sure to scale the image to the correct size and orientation.
Printing from The GIMP
NOTE: HP recommends that you use GIMPPrint/GuttenPrint v5.0 or greater.
Steps:
- Select "File" in GIMP.
- Click "Print with Gutenprint"
- Click "Setup Printer..."
- Click the drop down next to "Printer Queue"
- Select the desired printer to print.
- Click "Ok"
- Click "Print"
The print should complete as expected.
Printing on CDs and DVDs Using the Photosmart D5100
You can print directly special printable CD and DVD media from your Photosmart D5100. This printer allows you to print on either 3-inch (80mm) "Mini" or 5-inch (120mm) media.
To print on one of these media, you must configure the printer as follows:
- Go to http://localhost:631
- Click on the Printer
- Click the Tools and Settings Tab
- Configure Tab
- Set the paper type as CD/DVD 80mm or CD/DVD 120mm
- Set the paper tray as CD/DVD tray
You must then format the image to fit on this media. For the 5-inch and 3-inch media, The printable area is 5x-5 inches or 3.3x-3.3 inches, respectively. The diameter of the non-printable area around the inside hole can be 0.8 or 1.6 inches for the 5-inch media; and 1.7 inch diameter for the 3-inch media. You can use any label-making application that supports CD labels to do this.


